 |
The Great Tree
still kickin'
|
| View previous topic :: View next topic |
| Author |
Message |
Cycreim
Great Tree Officer


Joined: 22 Dec 2003
Posts: 1274
Location: Toronto, ON
|
 Posted: Wed Apr 04, 2007 5:18 pm Post subject: Stained Glass Photoshop Tutorial Posted: Wed Apr 04, 2007 5:18 pm Post subject: Stained Glass Photoshop Tutorial |
 |
|
Here you go, I hope this helps...
Cyc's Stained Glass Tutorial
- Step 1 -
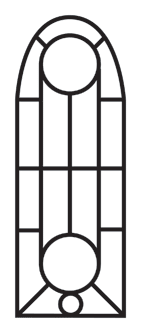
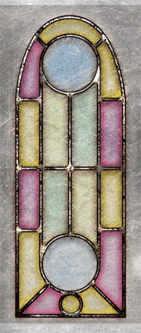
You start out by laying out your lead lines, plotting out your window in black and white. You need to include ALL of your lines at this stage, because there will be no going back later. Your whole design depends on having this step done and done by this point, so make sure you get it right. 
Make it high resolution. The higher the resolution you work at, the easier it will be. For the DRC window project, working at 2048 x 2048 (2x the required dimensions) is plenty.
For this example, I made a simple window in Illustrator. It looks like so:
- Step 2 -
Bring your design into Photoshop and paste the image in as a layer. Call it "Original Lines".
Duplicate that layer and call it "Sub Colour". Using the paint tool, paint the glass in whatever colours you want. These are the basic basic colours of your window. Try for nice colour harmony and just be finnicky until you get what you want. Here's what the image should look like once you're done:

- Step 3 -
Duplicate "Original Lines" again and set it to the topmost layer. Call it "Pane Tint".
This step is pretty time consuming but it will give each pane of glass a slightly different shade, making it look more stained-glassy.
Like Step 2, paint the window panes in, but this time using random desaturated colours. Or, you could paint in saturated colours and use the Hue and Saturation tool to desaturate the results.
Nevertheless, if all goes well, you should have a layer that looks something like this:

Set the blending mode to "Overlay".
- Step 4 -
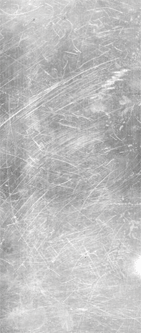
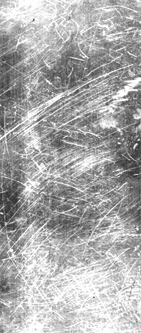
Find some stock image of scuffed or scratched metal. It looks sort of like an ice rink that's been skated on a bit too often... Paste it into a new layer and call it "Interior Scuffs" and resize it to taste:
Create a layer mask for "Interior Scuffs". Copy the contents of your Original Lines layer and paste it into the layer mask. Then apply a gaussian blur. Then, use the magic wand or the Select / Colour Range to make the Original Lines layer into a selection, and fill the selection with white.
Play around with the levels until you've got it looking the way you want.
It should look like this when you're done:
Set the blending mode to Overlay. And tadah! You should have something like this:

- Step 5 -
Duplicate the Sub Colour layer and set it to the topmost layer. Set the blending mode to Screen.
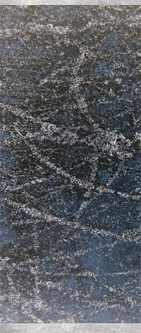
Find a texture for the surface of the glass. I chose this image of concrete with deep scratches. I inverted it (so that the cracks appeared lighter) and resized it to fit the window:
Name this level "Surface Texture" and set the blending mode to Difference. Set the opacity to somewhere around 15% or 16%, depending on the texture you've chosen. It should then look like this:
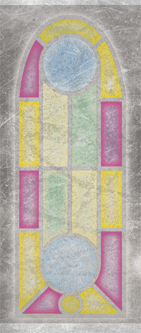
Fairly subtle, but still there.
- Step 6 -
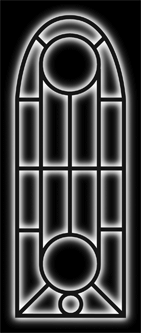
Duplicate Original Lines and move it to the foreground. Call this layer "Lead Lines".
Set the layer to multiply.
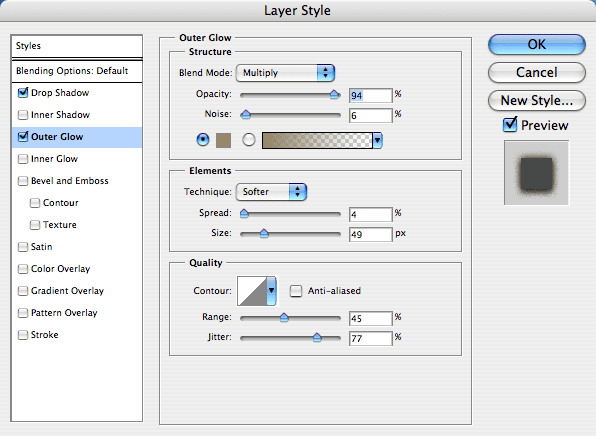
Add an Outer Glow layer effect. This will make your glass look more dimensional. These are the settings I used, but you can experiment to see what looks right for you.
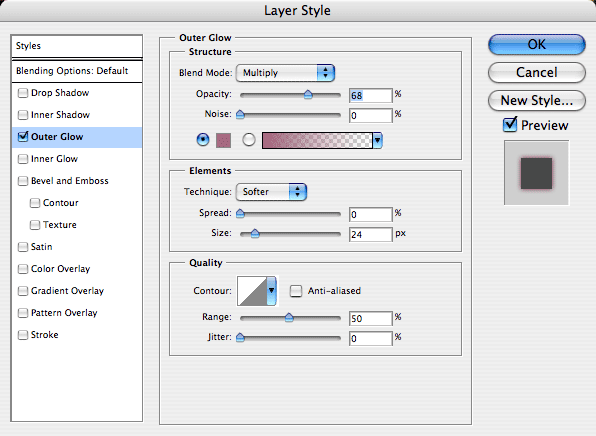
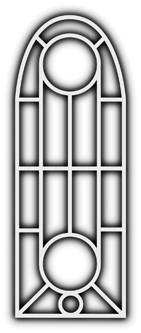
The lines plus the outer glow should make your composition look like this:
- Step 7 -
Get a nice juicy corroded texture for your lead lines. I used the concrete one again. Paste it into a new layer called "Lead Lines Texture" and use Hue and Saturation and Levels to give it a really grungy, dark look, ala this:

Create a layer mask for this layer. Use your original lines again as the layer mask, and invert it so that it's white lines on black. Then use a gaussian blur to smooth out your lines. You don't want your blurred lines to be bleeding over onto the glass planes too much, so be conservative.
Then, use layers to narrow your blurred lines by pumping up the black. You can also use Brightness and Contrast, but I'm a fool for Levels.
Regardless, when you're done, your layer mask should look like this:

Add a Drop Shadow layer effect. Here are the settings I used. Note the light direction coming from above. This really helps to make your lead lines pop:
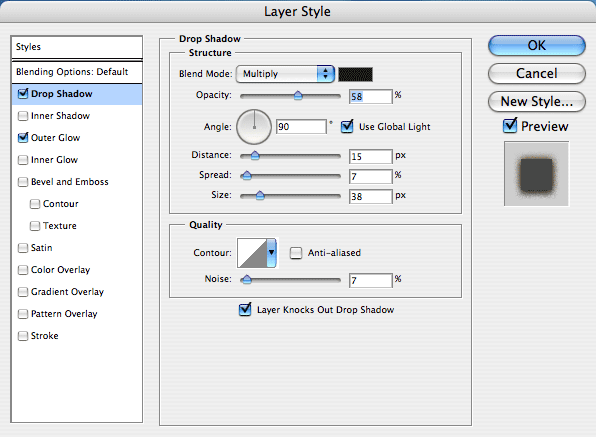
Then add an Outer Glow layer effect. Here are the settings I used:
You're done with this layer.
- Step 8 -
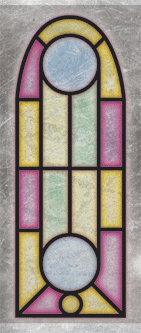
Duplicate Interior Scuffs and move it to the uppermost layer. Use Brightness and Contrast to up the contrast of the texture.
Your texture should now look like this:
and invert the layer mask so that it looks like this:
When you're done, your window will look like so:
- Step 9 -
Using the Dodge tool set to "highlights", paint some highlights into your Lead Lines Texture layer. Imagine the light coming from roughly above your window. Just fool around until it looks right. Here's what I did:
- Step 10 -
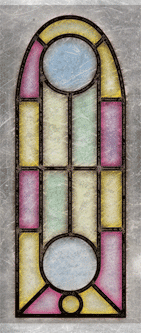
Once you're done this, go back and make your own edits until you've got something that looks nice. I used Levels a lot, but also Hue and Saturation to get the right effects.

There you go! You're done! I hope this helps.
_________________
KI: 34353
Last edited by Cycreim on Thu Apr 05, 2007 9:20 am; edited 1 time in total |
|
| Back to top |
|
 |
Professor Askew
Great Tree Member

Joined: 23 Dec 2003
Posts: 2532
Location: Bloomfield, CT
|
| Posted: Wed Apr 04, 2007 10:07 pm Post subject: |
|
|
Wow. Nice work. Now everyone has a fightin' chance. lol
_________________
Professor Daniel Askew - Securing our reality from the machinations of the Station Masters. |
|
| Back to top |
|
|
Erik
Great Tree Member

Joined: 23 Sep 2006
Posts: 1121
Location: the Netherlands
|
| Posted: Thu Apr 05, 2007 8:18 am Post subject: |
|
|
Thank you for this tutorial! I think I'll give it a try now!  |
|
| Back to top |
|
|
tetters
Explorer

Joined: 06 Mar 2007
Posts: 35
Location: Toronto, Ontario, Canada
|
| Posted: Thu Apr 05, 2007 9:08 am Post subject: |
|
|
Cool. Now I need Photoshop... 
_________________
"Life is not a journey to the grave with intentions of arriving safely in a pretty well-preserved body, but rather to skid in broadside, thoroughly used up, totally worn out and loudly proclaiming...
WOW! What a ride!"
-Anonymous- |
|
| Back to top |
|
|
Ian [Atrus]
Explorer

Joined: 17 Apr 2004
Posts: 12
Location: Italy
|
| Posted: Thu Apr 05, 2007 9:32 am Post subject: |
|
|
Great tutorial!
I hope my PC comes back soon so I can try it out...
_________________
"We are the kolbitar, the coal-eaters; we sit by the fire in winter and tell stories of a younger world." |
|
| Back to top |
|
|
Eleri
Great Tree Member

Joined: 27 May 2004
Posts: 819
|
| Posted: Thu Apr 05, 2007 10:11 am Post subject: |
|
|
I'll have to apply some of those ideas. I do mine very differently, though. Maybe I should make a tutorial too?
_________________

 |
|
| Back to top |
|
|
Durin Mephit
Great Tree Officer

Joined: 29 Jan 2004
Posts: 3119
Location: Tigard, OR
|
| Posted: Thu Apr 05, 2007 10:13 am Post subject: |
|
|
Cool tutorial!
Doesn't help that my art still sucks! 
Thank you for sharing though. I'm sure some others will make some good use of it.
_________________
Durin Mephit * Member of Guild of Messengers - Unless otherwise stated, opinions are mine only and not Guild endorsed.
rel.to | Marten KI: 59474 | Durin M KI: 11883768 |
|
| Back to top |
|
|
Cycreim
Great Tree Officer
Joined: 22 Dec 2003
Posts: 1274
Location: Toronto, ON
|
| Posted: Thu Apr 05, 2007 11:28 am Post subject: |
|
|
Oh by all means, Eleri. You know how I feel about making information public.
_________________
KI: 34353 |
|
| Back to top |
|
|
|
|
You cannot post new topics in this forum
You cannot reply to topics in this forum
You cannot edit your posts in this forum
You cannot delete your posts in this forum
You cannot vote in polls in this forum
|
|

